Sunday, May 30, 2010

Spicy Asian Style Marinated Chicken Breast


Since the warm weather is finally here it's time to fire up the grill. We do grill in the winter, however once it gets warm out, I will say that 80% of our meals are prepared outside. We enjoy eating great foods, but seem to enjoy our meals better when they are less fating. This is one recipe that we can eat and not feel guilty about. I have used this marinade on flank steaks and both my husband and I thought it was amazing, but once I tried this marinade on chicken breast I thought it was out of this world. I think I'm going to have to try in on chicken wings next time, I just love this marinade! LOL!

I have to admit that we have this once a week just because it's so tasty, and the chicken is so moist. It goes well with just about any side. On really hot days we slice it into thin strips and and use it to top a nice green salad. Other times I make a nice caramelized red onion risotto with steamed broccoli. I hope you enjoy it as much as we do. Happy cooking!

WHAT YOU WILL NEED:

2-3 lb Chicken breast thinly sliced
1 Lemon (juiced)
3-4 tablespoons olive oil
3 Cloves of garlic
1/2 Teaspoon of ground cumin
2 Tablespoons of honey
2 Dried whole Pasilla Chili with seeds (this is a mild pepper used in Latin cooking)
1 Tablespoon of soy sauce
1 Tablespoon of worcestershire sauce
1 Teaspoon of roasted red chili paste (any Asian brand)
1 few drops of green habanero chili sauce
Salt and pepper to taste


WHAT YOU WILL NEED TO DO:

Add all the above ingredients (besides the chicken, salt and pepper) into blender, and blend until you have created a nice smooth sauce.

Next take your chicken breast and trim off excess fat.

Place in a sallow dish and season with salt and pepper.

Add the sauce that you prepared in the the blender and refrigerate over night.

Remove chicken from refrigerator 30 minutes before grilling, allow it to come to almost room temp.

Heat your grill on high for about 5 minutes.

Once hot place your chicken on the grill and cook 4-5 minutes per side (this might take longer, depending on the thickness of your chicken breasts.

Remove from heat and let sit for about 3-5 minutes before serving.

Next step...Enjoy your juicy marinated chicken breast!

Saturday, May 29, 2010

Cinnamon Apple Waffles


Every weekend I make big batches of breakfast foods so that once Jonathan gets up in the morning I have something ready for him. It is so easy to make pancakes, waffles french toast and freeze them into individual portions. In the morning when I'm trying to get everyone ready to go, the last thing I want to worry about is making breakfast. It's so nice to just pull something out the night before put in in the frig and in the morning all i have to do is put it in microwave to reheat.

So you might be wondering how I came up with this recipe...it's simple I had a recipe for basic Belgian waffles and I just adapted it to include a few extra ingredients. I had bought a jar of unsweetened apple sauce for Jonathan and for some reason I should get him to eat it. I tried a few different times, and each him he refused to eat it. I wasn't about to waste the apple sauce so I decided that I would just try to incorporate it into his pancakes and waffles, and it was a great idea. He loves the waffles and I don't feel guilty about wasting food. So everyone wins.

I hope you enjoy this recipe as much and Jonathan has. If you do try this recipe I would love your feedback on how it came out. Happy cooking!

WHAT YOU'LL NEED

2 cups cake flour
2 teaspoons baking powder
1/2 teaspoon salt
4 large eggs, separated
1/4 cup of unsweetened organic apple sauce (I use Motts)
2 tablespoons sugar
2-3 tablespoons of cinnamon
1/2 teaspoon vanilla extract (Always use REAL vanilla extract)
4 tablespoons unsalted butter, melted
2 cups milk
non-stick cooking spray

WHAT YOU'LL NEED TO DO:

Preheat the waffle iron according to the manufacturer's instructions.

In a medium bowl sift together flour, baking powder, and salt and set aside.

In a second bowl use the wooden spoon to beat together the egg yolks and sugar until sugar is completely dissolved and eggs have turned a pale yellow.

Add the vanilla extract, cinnamon, melted butter, apple sauce, and milk to the eggs and whisk to combine.

Combine the egg-milk mixture with the flour mixture and whisk just until blended. Do not over mix.

In third bowl, beat the egg whites with an electric mixer until soft peaks form, about 1 minute.

Using the rubber spatula, gently fold the egg whites into the waffle batter. Do not overmix!

Coat the waffle iron with non-stick cooking spray and pour enough batter in iron to just cover waffle grid.

Close and cook as per manufacturer's instructions until golden brown.

Serve immediately with your favorite toppings.

Enjoy!

Thursday, May 27, 2010

Funfetti Cupcakes topped with Chocolate Frosting and Sprinkles


For Jonathan's birthday I wanted to bake him strawberry cupcakes to take to daycare...however i didn't know if everyone would like that so I decided that I would make funfetti cupcakes. Who doesn't like funfetti? Anyway the cupcakes were a huge hit at both daycare and at my work place. I will surely make this recipe again.

I will admit that after working a 12 hour day, and not getting home until late I cheated and used canned frosting. They still came out really good, but hopefully next time I will be able to make my own frosting as well.

Happy baking!

RECIPE...is from Loves to Eat's food blog, link below...
http://lovestoeat.wordpress.com/2009/03/22/funfetti-cupakes/

WHAT YOU'LL NEED:
1/2 cup milk (I used skim milk and it worked very well)
3 large egg whites
1 teaspoon vanilla extract (always use the good extracts)
1/4 teaspoon almond extract
1 1/4 cups AP flour
1 cup sugar ( I used a little a full 3/4 cup of sugar)
1/2 teaspoon salt
2 teaspoon baking powder
6 tablespoon butter, soft (I tend to always use unsalted butter when baking)
4 tablespoons rainbow sprinkles (Jonathan loves sprinkles so I tend to use extra original recipe calls for only 2 tablespoon)

WHAT YOU'LL NEED TO DO:
Start by preheating our oven to 350F.

Line a 12-cup muffin tin/stone with paper liners.

In a mixing bowl, whisk together milk, egg whites and extracts. Set aside.

In our electric mixer combine flour, sugar, salt and baking powder. Stir to combine.

Cut in butter with the paddle attachment at low speed, until mixture is coarse and sandy.

Add milk mixture and beat at medium speed for 1 1/2 minutes.

Scrape sides of bowl and continue beating for 20-30 seconds.

Stir in our sprinkles.

Divide batter evenly into prepared pan.

Bake for for 15 minutes, or until a tester comes out clean. (If you use a stoneware like myself then you will have to bake for a longer time.)

Remove from pan and cool completely on a wire cooling rack before frosting.

Frost with your favorite frosting and top with extra sprinkles.

Saturday, May 22, 2010

Whole Wheat Stuffed Sausage and Broccoli Bread


So today is my bake stuffed bread day... not exactly how I wanted to spend my Saturday but at least I'm making tons of great breads for a friend. Who am I so keep a pregnant women from having the things she craves. LOL!

So while Jonathan was napping I spent my time in the kitchen baking some yummy breads for us to bring over later this afternoon. And I have to confess that I also made an extra one for the house. Jonathan and I have already cut into one and have both and a nice warm piece.

Happy baking everyone!

Recipe for whole wheat dough.... http://sandrafoodblog.blogspot.com/2010/04/whole-wheat-pizza-dough.html


WHAT YOU ARE GOING TO NEED:

1 Homemade whole wheat pizza dough (store bought is fine, but make my own link to the dough recipe above)
3 sausage spicy Italian links
1 medium red onion chopped
1 medium broccoli crown cut into bite size pieces
Olive oil
Garlic salt
Dry basil

WHAT YOU WILL DO:

Preheat oven to 350

Open sausage links and crumble the meat.

In a hot medium saute pan, add crumbled sausage and allow it to brown and cook.

Once sausage it cooked, remove from heat place on paper towel to drain excess fat. Return pan to heat and saute onion.

Once onion is cooked place onions in a small bowl.

Steam broccoli until slightly tender.

While everything cools, take your dough and roll it out into a square.

Once you have rolled out your dough, take the sausage and sprinkle it over the dough, top with onions, and broccoli.

Starting at one end, take the dough and start rolling it onto itself, to create a log.

Place on cookie sheet and let stand for 15 minutes, once 15 minutes have passed brush the top of the bread with olive oil, sprinkle garlic salt and basil.

Place in oven and let bake for about 30 minutes until it becomes golden brown.

Serve with a side of your favorite sauce. Enjoy!

Stuffed Pepperroni and Cheese Bread


At a friends request, today I am spending the afternoon making stuffed breads to bring over to her house for a little get together. Being that she is the host, who am I to say no. =)

Besides not only is this a yummy recipe it takes almost no time at all to put together, which in my book is a huge plus. Hope you all enjoy this recipe as much as we do. Happy baking!


Pizza dough recipe courtesy Tyler Florence, the rest of the recipe is an original. link to dough recipe below
http://www.foodnetwork.com/recipes/tyler-florence/fresh-pizza-dough-recipe/index.html


WHAT YOU ARE GOING TO NEED:

1 Homemade pizza dough (store bought is fine, but I use Tyler Florance's recipe link to pizza dough above)
1/4 lb of pizza size pepperoni
2-3 cloves of garlic minced
1/2 cup of shredded mozzarella
Olive oil
Dry basil

WHAT YOU WILL DO:

Preheat oven to 350

Take your dough and roll it out into a square.

Once you have rolled out your dough, take the pepperoni and cover the dough with slices.

Take the garlic and sprinkle over the pepperoni and the top with shredded cheese.

Starting at one end, take the dough and start rolling it onto itself, to create a log.

Place on cookie sheet and let stand for 15 minutes, once 15 minutes have passed brush the top of the bread with olive oil, sprinkle garlic salt and basil.

Place in oven and let bake for about 30 minutes until it becomes a lite golden brown.

Serve with a side of your favorite sauce. Enjoy!

Friday, May 21, 2010

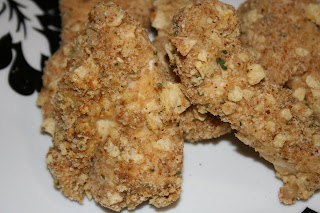
Crispy Oven Fried Chicken Tenders....


So having toddlers means having to be creative when it comes to making meals. You want to make them the foods they like, but most importantly you want them to get the best nutrition. Jonathan has always been really good about eating his veggies and fruit...but for some reason beef and chicken have always been an issue. Personally I think it's a texture thing and he actually starting eat chicken in small amounts after he turned 22 months old.

Now that he is going to be 2 years old, the now asks...."Mommy Chicken...PLEASE!" How can a say no when he asks so nicely. LOL! I love the fact that I am able to give him a good source of protein without having to deep fry it to make it taste good.

The blend of cornflakes and breadcrumbs gives the chicken a nice crisp coating and a beautiful golden color. Say good bye to soggy chicken tenders and say hello to crunchy goodness. Happy cooking!

Recipe adapted from the "Skinny Comfort Foods" Cookbook

WHAT YOU WILL NEED:

4 egg whites
1/4 cup of 2% milk (I use skim)
6 (6oz each) skinless chicken breasts (cut into tender size or nugget size...whatever you prefer)
1/4 cup AP flour
1.5 cups finely crushed cornflakes (I put in it in a ziplock bag and then use my rolling pin to get a nice texture)
3/4 cup dry breadcrumbs
Butter flavor vegetable cooking spray
salt and pepper to taste
juice from one lemon

WHAT YOU WILL NEED TO DO:

Take you cut up chicken breast and season with salt, fresh ground pepper and lemon juice set aside and let marinate for 10-15 minutes with you prepare everything else.

Preheat oven to 400 degrees,

Line a baking pan with foil and spray with cooking spray set aside.

In a medium bowl beat egg whites, and milk together until blended.

Coat chicken breast with flour, dip in egg mixture, and then coat generously with cornflake and breadcrumb mixture.

Place coated chicken on your prepared baking pan and bake for 15 minutes on each side until chicken is browned and juices run clear.

Serve warm!

Nutritional Information of 6oz of chicken... 387 calories, 5.4gm fat, 104.2mg of cholesterol, 44.8gm of protein, 36gm carbs, 557mg sodium

Friday, May 14, 2010

Grilled Lobsters


As part of our Mother's Day dinner we had grilled lobsters. I have admit, that I wasn't a big fan of lobster. I have always found it to be blend. But this recipe change my whole view on it, and left me wanting more.

If you are like myself and are on the fence about lobster, the highly recommend try this recipe at least one, you will not be disappointed.

Happy Grilling!

Recipe source...my father-in-law (the recipe below was for 3 lobsters)

WHAT YOU WILL NEED:

1 live lobster per person about (1.25-1.50lb each)with this you are going to require a large pot to boil your lobster
2-3 cloves of garlic minced
salt and pepper (to taste)
one bunch of parsley
juice of one lemon
3 tablespoons of butter melted
paprika
1/4 Mozzarella cheese (just enough to sprinkle on each one)

WHAT YOU WILL NEED TO DO:

Fill large pot with water, add salt, and bring to a good boil.

Take you live lobsters and put them in the freezer for about 5-7 minutes just long enough for them to become dormant.

Remove lobsters from freezer and place in boiling water. Cover and let cook for about 10-12 minutes (until lobster shell becomes a nice bright red)

Remove lobsters from pot and set them aside to cool.

In a small blow melt butter, add minced garlic, finely chopped parsley, and lemon juice, combine together and set aide.

Preheat grill.

Once your lobsters have cooled take one at a time, and cut in down the center.

Place each half on a cookie sheet and top with butter mixture, and then a sprinkle of cheese. Sprinkle each one with a tiny pinch of paprika.

Place each half on the grill and let cook until the cheese begins to melt, and lobster meat is warm (about 3 minutes)

Remove from grill and serve right away!