My food blog is about the foods that I actually make for my family. My schedule is so crazy that I tend to turn meals that are easy for an active family, all while trying to make healthy choices. And of course you will find an occasional not so healthy meals, or treats but like they say..."everything in moderation!"
Tuesday, November 30, 2010
Sweet Potato Casserole w/ Marshmallow and Cornflake Topping
I feel like every holiday, my husband likes to add more work to my day. My down fall is I love to cook and try new things so I never say no. This year he asked that I make him a potato casserole. I am not a sweet potato fan so I didn't plan on having it on my meal plan for the day, but since he asked so nicely I couldn't say no.
In my search for the perfect recipe I came across a lot of recipes, but nothing that really make me go that sounds like a great recipe. So I decided that I would take the main ingredients, doctor it up by adding a few ingredients and adding others ingredients so I could tailor it to my husband's likes and dislikes. I also went as far as to change the cooking methods and techniques, I am pleased to say, that I was so happy with the way it came out, and I just had to taste it for myself. Like I said before I am not a fan of sweet potatoes, but this recipe was so good that I actually had a full serving at Thanksgiving.
The fact that I actually enjoyed it means that they recipe had to be pretty amazing. My husband enjoyed it so much that he asked if I could use this recipe on a regular bases. So it appears that it got the seal of approval with the family.
Happy Cooking!
Inspired by the food network kitchen
WHAT YOU'LL NEED:
5 pounds sweet potatoes pealed and cut into large chunks
3 large eggs, lightly beaten
4 tablespoons unsalted butter, melted, plus more for the preparing the pan
4 tablespoons packed dark brown sugar
salt to taste
1 teaspoon ground cinnamon
1 teaspoon ground ginger
1 large pinch of grated nutmeg
Freshly ground black pepper to taste
3/4 heavy cream
about 1 cup of mini Marshmallow
2 cups cornflakes (enough to cover the top of the casserole)
Directions
Preheat the oven to 350 degrees F.
On a large stockpot add water (enough to cover sweet potatoes)
Put the sweet potatoes into boiling water and allow to boil until tender.
Drain from water and set aside to cool.
Scoop the sweet potato into blender and blend until smooth.
Transfer potato puree into a stand mixer and add the eggs, butter, brown sugar, salt, cinnamon, ginger, nutmeg, pepper and heavy cream.
Blend until mixture until smooth.
Butter a casserole dish and pour the sweet potato mixture into the pan.
Then top with a little layer of mini marshmallows, now top that with cornflakes.
Bake until puffed, and cornflakes are browned (about 30 minutes.)
Serve immediately.
Labels:
Holiday Dishes,
Potato,
Sides,
Thanksgiving,
Veggies
Sunday, November 28, 2010
No Bake Ladyfingers Pineapple Cheesecake
If you ask my Husband he will tell you that this is by far the best ladyfingers cheesecake that he has ever had. This recipe is one that my mother would make all the time when I was growing up. When I asked my mother where she got the recipe all she could say is I got it from a family member years ago, and she didn't know where they got it. So unfortunately I can't site it back any further than my mother.
What I can tell you is I have made a few adjustments from how my mother makes it. I hope that you all enjoy this recipe as much as my husband and son do. The look on their faces when I put it on the table on Thanksgiving was priceless. It was the first time I made it and the first time they have had it since my parents moved away almost 23 years ago. I hope you all enjoy this recipe as much as they did.
Happy baking...or in this case happing mixing! And like always if you do make this recipe, I would love to hear your feedback.
WHAT YOU'LL NEED:
3 8oz Packages cream cheese at room temp (I like to use the 1/3 less fat cream cheese)
2 6oz Cartons of heavy cream
1 1/2 Cups of sugar (my mother uses 1 3/4cups) I like to use less because you have the sweetness from the pineapple topping
1 teaspoon of vanilla (like always use the feel good stuff)
2 packages of soft ladyfingers (this could be found at your local store in the bakery section)
1 can of crushed pineapple
WHAT YOU'LL NEED TO DO:
Line the bottom and sides of your spring from.
In your stand mixer add cream cheese, sugar, vanilla. Once combined add in heavy cream and mix for about another 2 minutes until well combined.
At this point you should have a fluffy yet dense mixture (it should not be watery or runny)
Take mixture and pour half into perpared spring form then take remaining ladyfingers and layer over cream cheese mixture.
Once you have layed your ladyfingers, take remaining cream cheese mixture and layer it over the ladyfingers.
Put into the frig for at least 3-4 hours if not over night.
Before serving open can of crushed pineapple and drine juices. Take the drained pineapple and top your cheesecake.
All that is left to do is enjoy!
Labels:
Baked Goods,
Holiday Dishes,
Thanksgiving
Sauteed Broccoli Rabe
This is by far the best way I to prepare broccoli rabe. Being that my family isn't the biggest group of corn lovers. I thought that this year for Thanksgiving I would make broccoli rabe. Almost everyone loves fresh in season broccoli rabe so why not pair it with my turkey dinner?
This was super easy and super yummy recipe. Everyone loved it and I had no leftovers which makes me happy. Try this recipe I grantee that you wouldn't be disappointed.
WHAT YOU'LL NEED:
4 bunches (about 1lb each) broccoli rabe with stems trimmed
1/4 cup olive oil
3 garlic cloves, minced
1/2 teaspoon dried crushed red pepper flakes
Salt
Fresh ground pepper
2 tablespoons pine nuts, toasted
WHAT YOU'LL NEED TO DO:
Working in batches, cook the broccoli rabe in a large pot of boiling salted water until crisp tender, about 1 minute per bunch.
Transfer the broccoli rabe to a large bowl of ice water to cool.
Reserve about 1/4 cup of the cooking liquid.
Strain the cooled broccoli rabe and set aside.
Heat the oil in a heavy large skillet over medium heat.
Add the garlic and red pepper flakes, and saute until the garlic is golden, about 1 minute.
Reduce heat to medium-low.
Add the broccoli rabe and toss to coat.
Add the reserved cooking water, and cook until the broccoli rabe is heated through and the stems are tender, about 4 minutes.
Season with salt, fresh pepper to taste.
Just before serving, toss the mixture with the pine nuts.
Labels:
Holiday Dishes,
Sides,
Thanksgiving,
Veggies
Bobby Flay's Parker House Rolls
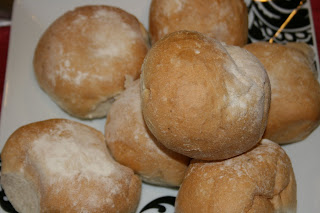
Let me draw you a picture...it's Thanksgiving morning and the bakery that I get my bread from is closed. The nearest bakery that I've used and trust is 20 miles away. We are hosting Thanksgiving and neither my husband or I can afford to spend an hour in the car just to go pick up bread. So the only thing left to do is to try baking my own batch.
We don't really eat much bread with dinner, but since we where having a late dinner, my thought was that late afternoon people might get hungry and want to make some mini sandwiches. So I was left with on other choice but to try to bake my very first dinner roll. Yes, I've made a loaf of bread before, but something about working with yeast is intimidating.
Luckily this recipe was easy enough that the end result was terrific. This will surely be a recipe that I use over and over again, especially when we have dinner guests. Hope you all enjoy them as much as I did.
Happy Baking!
Recipe courtesy Bobby Flay
WHAT YOU'LL NEED:
1 1/2 cups milk
1 stick unsalted butter, cut into pieces, plus more for brushing
1/2 cup sugar
1 package active dry yeast
1/2 cup warm water
3 large eggs, lightly beaten
1 1/2 teaspoons salt
6 cups all-purpose flour
WHAT YOU'LL NEED TO DO:
Place milk in a small saucepan and bring to a simmer.
Remove from the heat, stir in the butter and sugar and let cool.
Dissolve yeast in warm water and let sit until foamy. (about 10-15 minutes)
Combine milk mixture, eggs, yeast, salt, and 1/2 of the flour in a mixer with the dough attachment and mix until smooth.
Add the remaining flour, 1/2 cup at a time, and stir until a smooth ball forms.
Remove from the bowl and knead by hand on a floured surface for about 5 minutes.
Place in greased bowl, cover, and let rise in a warm place until doubled in size. (this will take about an hour)
On a floured surface, punch down the dough and shape into desired shapes.
Place on a parchment paper-lined baking sheet.
Dust rolls with flour and cover again and let rise until doubled, (another 30 to 40 minutes.)
Preheat the oven 350 degrees F.
Bake for about 20 minutes or until golden brown.
Remove from the oven and brush with melted butter before serving.
Labels:
Bobby Flay,
Bread,
Holiday Dishes,
Thanksgiving
Wednesday, November 24, 2010
How to Cook a Turkey
I tend to make turkey a few times a year, and it seems that around this time every year I'm asked by someone how to cook a turkey. So I thought that this year I would write a post detailing the process so that people could access it before turkey day, or any other day for that matter.
Cooking a turkey without drying out the white meat is a lot simpler than it seems. One must keep in mind that a turkey takes a long while to cook through to the bone. And it is important to remove it from the oven once it reaches 180 degrees. And finally you have to make sure that you roast the bird at a high enough temperature to keep it safe to eat without overcook it.
Allow about 15 minutes of cooking time per pound and about 20 minutes per pound if the bird is cooked with stuffing. So keep this in mind when planning dinner. Determine what time you would like to have dinner and then work backwards to determine the time the turkey needs to go into the oven.
Preheat oven to 325.
Brine your turkey for 24 hours to insure a tender, juicy bird. (Brine recipe to follow in Thanksgiving post)
Place turkey breast side up on a rack in a shallow roasting pan.
Insert meat thermometer in thigh. Add just enough water to over the bottom of pan, (I tend to use the liquid from the brine.)
Cover turkey loosely with a tent of heavy-duty aluminum foil.
Roast the turkey until temperature in the thickest part of the thigh reaches 180°F.
Cooking time will vary. For example, a 20 pound turkey will take 4 1/4 to 5 hours to cook, check the temperature on the thermometer after 4 hours.
Remove the foil tent after 1 to 1 1/2 hours of cooking time to brown the skin.
Brush with vegetable oil or maple syrup to enhance browning
A whole turkey is done when the temperature reaches 180°F.
Do make sure that you don't overcook your turkey you must remove it from the oven once it reaches 180 degrees. Let it rest for about 20 minutes while you get the rest of dinner ready to serve. Once 20 minutes have passed you are able to crave the turkey.
Once it reaches this temperature the thigh juices should run clear when pierced with a fork and the leg should move freely.
It's that simple. Just follow the above steps and you too will have a fully cooked, tender juicy turkey!
Happy Cooking!
Labels:
Holiday Dishes,
Thanksgiving,
Turkey
Wednesday, November 17, 2010
Turkey, Sausage and Veggie Lasagna
If you believe that the only way to make Lasagna is to use fatty meats then I have news for you! This recipe is by far one of the best lasagnas I have ever had or made for that matter.
By now you all know how I feel about fat and extra calories in my meals. I'm a firm believer that if you substitute a few items you can make any dish taste just as good, as the ones with double the fat content. I promise that the few things that I have done will not compromised the savory taste of the Lasagna.
Besides my obsession with fat and calorie content, the other driving factor behind this recipe is me wanting to incorporate more veggie into my family's diet. Having a 2 and a half year-old who is now starting to develop likes and dislikes, it's becoming harder to get him to eat his veggies. In the recipe I am able to hide the veggies and take comfort in the fact that he is getting enough veggies in his daily intake.
This lasagna to make ahead of time and bake when you are ready to eat it. This is great to make for the late nights at work and is a great dish to bring to a new parent or someone who is recovering from a medical issue. I heats up great and taste fresh for days after baking.
I hope you all enjoy this recipe, and like always...HAPPY COOKING!
WHAT YOU'LL NEED:
1 1/2 pounds ground turkey
1 pound Italian sausage (I like to use turkey sausage)cut into thin slices
1 large onion diced
2 large carrots finely diced
1 green squash finely diced
1 medium size red bell pepper finely chopped
2 cloves garlic, minced
2 teaspoons ground oregano
1 teaspoon ground basil
1/2 teaspoon salt
1/4 teaspoon pepper
1 (14.5-ounce) can diced tomatoes with basil, garlic, and oregano
2 (15-ounce) cans tomato sauce
1 (6-ounce) can tomato paste
1 1/2 cups small cottage cheese
1 (5-ounce) package grated Parmigianno-Reggiano
2 tablespoons freshly chopped parsley leaves
2 large eggs, lightly beaten
oven-ready lasagna noodles
1 (8-ounce) packages shredded mozzarella
WHAT YOU'LL NEED TO DO:
Preheat oven to 350 degrees F.
On outdoor grill out using a stove-top griddle, grill sausages until golden brown.
In a large saucepan, combine ground turkey, veggies, and garlic. Cook over medium heat until meat is browned and crumbled.
Once meat and veggies are cooked make sure to drain the fat and liquids.
Return meat to pan and add oregano, basil, salt and pepper.
Add tomatoes, tomato sauce and tomato paste.
Bring to a boil, reduce heat and simmer 30 to 45 minutes.
In a small bowl, combine cottage cheese, Parmesan, parsley, and eggs.
Spoon 1/4 of sauce into bottom of a 13 by 9 by 2-inch baking pan.
Place row of uncooked lasagna noodles on top of sauce.
Overlapping the noodles just a little.
Spread 1/3 of cottage cheese mixture over noodles and then top with 1/4 of sauce and 1/3 mozzarella cheese.
Repeat layers, ending with sauce, reserving 1/3 of mozzarella cheese.
Bake 45 minutes.
Top with remaining cheese and bake 15 minutes or until hot and bubbly.
Let rest 10 minutes before serving.
Labels:
Freezer meals,
Pasta,
Pork,
Toddler Menu
Port Cranberry Sauce
I Love Thanksgiving! Not only because I get to cook, but also because it's all about spending time with the ones you love. I find that other holidays have become so commercialized that we, as consumers are more concerned with finding the perfect gift and we loss sight of what we're celebrating. Thanksgiving in my mind is all about looking back on the passed year and being grateful for everything we have.
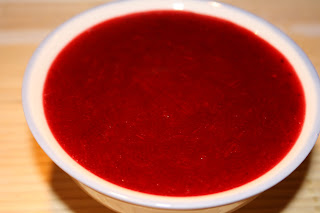
I also feel that Thanksgiving is about the traditional foods. How can one have Turkey without the traditional cranberry sauce? Answer...You can't! What pulled me into this recipe is the fact that it calls for Port wine. Being that I'm Portuguese I have tons of bottles of Port wine, I thought I could give this traditional American dish a Portuguese twist, like your truly! =)
This was a great recipe and I will surely make it on Thanksgiving for my guests. I hope you all enjoy it as much as my husband has.
Recipe adapted of Emeril
WHAT YOU'LL NEED:
12 oz cranberries
1 orange, juiced and grated orange zest
1 cup Port
1 cup sugar, (cranberries can be very tart)
1 teaspoon cinnamon
1 tablespoon cornstarch
WHAT YOU'LL NEED TO DO
In a small saucepan combine cranberries, orange juice and zest, port, sugar and cinnamon.
Bring to a boil, reduce heat to simmering and cook until cranberries are tender, stirring occasionally.
Take off heat and puree in blender (if you want whole cranberries in your sauce skip this step) Then return cranberry sauce to heat in saucepan.
In a small cup make a slurry with cornstarch and 1 tablespoon water.
Whisk cornstarch mixture into cranberry sauce and cook, whisking, until sauce thickens.
Let cook and serve with turkey!
Labels:
Emeril,
Sides,
Thanksgiving
Friday, November 12, 2010
Weight Watchers Grilled Red Snapper With Herb Pesto
Let me first start off with saying sorry for the bad picture. My husband wanted to help and he took a picture of the wrong dish and then on top of that he only took one picture. I was actually thinking about not posting this recipe until I made it again, since I wasn't happy with the plating, but then again It was so delicious I couldn't wait to share it with all of you.
Anyway I have to say that this was a really good recipe. I did make a few changed to it because I wasn't a fan of some of the ingredients that they added, and I also grilled it different than the way they recommend. I do have the stove top griddle but I have the smell that fish leaves in the house so I always grill outside.
For people who are not familiar with Red Snapper delicate in flavor, mild, not unlike flounder but not as strong as swordfish. Red Snapper gets it's name from it's skin color not it's meat color so it is nothing like salmon. If you like firm white fish that is flaky then this is the fish for you. I recommend trying it at least once in your life time you will not be disappointed.
Adapted from Weight Watchers
WHAT YOU'LL NEED:
-1/4 cup fresh lemon juice
-1/4 cup dry white wine
-1 lb red snapper fish (if you do not feel comfortable cooking a whole fish then then you could use fillets)
-1 cup packed fresh basil leaves
-1/2 cup packed fresh parsley leaves
-1 Tbs. plus 1 tsp. olive oil
-2 garlic cloves
-1/4 tsp. salt
-Fresh ground black pepper, to taste
-Cooking spray
WHAT YOU'LL NEED TO DO:
To prepare the marinade, in a gallon-size sealable plastic bag, combine the juice, wine and add the fish
Seal the bag, squeezing out air; turn to coat the fish
Refrigerate at least 2 hours or overnight, turning the bag occasionally
Take a sheet of foil (big enough to wrap the fish) and spray foil with nonstick cooking spray
Take the fish and place on prepared foil.
In a food processor blend the basil, parsley, oil, garlic, salt and pepper; puree until smooth.
Preheat grill and then take the pesto paste and spread all over the fish.
Once the fish is coated wrap this dish tight in the foil and place on grill.
If you are doing a whole 1 lb fish on med heat let cook for 15 minutes and then flip and let cook for another 10 mins.
Once cooked Fish should flake nicely with a folk.
Serve along side with your favorite veggies and enjoy!
Nutrition Info: Calories 189, Fat 6g, Saturated Fat 1g, Cholesterol 40 mg, Sodium 284mg, Carbohydrate 7g, Fiber 1g, Protein 24g, Calcium 210mg
Labels:
200 Calorie Meals,
Fish,
Lite recipes,
Weight Watchers
Thursday, November 11, 2010
Portuguese Pork and Clams Alentejo-Style
I have to say that this is by far one of my favorite Portuguese meals. I think that that is the best way to describe this dish is to call it a 'Portuguese Surf & Turf'.
Carne à Alenteja is a dish from the southern Alentejo province of Portugal, which is known for it's cooking and great wine selections. The dish is something that is simple to make and would leaving your guests thinking you spent all day in the kitchen. It is a true winner in our home and is something that I will continue making for years to come.
A few things you might want to keep in mind when making this dish is small clams are better since they cook faster and usually taste better. And of course fresh clams are always best.
Also another thing that you might want to do is marinate the pork over night. I think that the meat is more tender and is pack full of flavor. If you do try this recipe please let me know how it comes out. I would love to get some feedback.
Like always Happy cooking!
Adapted from The Portuguese Homestyle Cookbook
Original Recipe Yield 4 to 6 servings
WHAT YOU'LL NEED:
1 1/2 cups dry white wine
1 teaspoon paprika
2 1/2 teaspoons salt
1/4 teaspoon black pepper
4 cloves garlic minced (we like garlic you could use half the amount if you like)
1 bay leaf
2 pounds pork loin, cut into 1 inch cubes
3 teaspoons olive oil, divided
2 onions, peeled and thinly sliced
2 teaspoons finely chopped garlic
2 tomatoes - peeled, seeded and chopped
1/4 teaspoon crushed red pepper flakes
24 small clams in shell, scrubbed
1/4 cup chopped fresh parsley
WHAT YOU'LL NEED TO DO:
In large bowl, combine wine, paprika, salt and pepper, blend well. Add garlic cloves, bay leaf, and cubed meat, turn meat in marinade to coat pieces. Marinate for 6 hours, turning occasionally.
Drain pork; reserve marinade. Pat cubes completely dry. Discard garlic and bay leaf. Melt 1 teaspoon of oil in large skillet.
Add pork cubes, stirring frequently so that the meat colors quickly and evenly. Transfer with slotted spoon to a bowl.
Pour reserved marinade into skillet and bring to a boil over high heat, scraping off any brown particles clinging to the inside of pan.
Boil briskly uncovered until marinade is reduced to 1 cup. Pour over pork and set aside.
In 6 to 8 quart pan, heat remaining 2 teaspoons oil; add onion and cook for 5 minutes, stirring frequently until onion is soft but not brown. Add garlic, tomatoes and crushed red pepper. Simmer, stirring constantly for 5 minutes.
Spread the clams, hinged side down, over the tomato sauce; cover the pan tightly and cook over medium to high heat for ten minutes or until clams open.
Stir in reserved pork and juices. Simmer for 5 minutes to heat thoroughly.
Sprinkle with parsley.
Saturday, November 6, 2010
Mississippi Mud Cupcakes w/ Chocolate Frosting
Ever since I saw Emeril's recipe of Mississippi Mud cake, I've been die to try it. It's been over a year and I just came upon the recipe again. Don't get me wrong cakes are great, but for some reason cupcakes just seem to go faster in my house.
Since the husband and the little man went to visit my in-laws in New York this weekend and since I was unable to sleep. I thought this was the perfect opportunity for me to try my hand at making my own version of Mississippi mud cupcakes. They came out so good, I can't wait to share them with my family tomorrow night after dinner...that is if they last that long.
Hope you enjoy them as much as I am =) Happy baking!
Recipe adapted from Emeril
2 cups all-purpose flour
1 1/2 cups sugar
1 teaspoon baking soda
1/2 teaspoon salt
1/2 pound unsalted butter + extra 2 tablespoons
1/3 cup cocoa powder
1 cup water
1/2 cup buttermilk
2 eggs, lightly beaten
teaspoon vanilla
8 ounces mini marshmallows
1/2 cup of nuts (you can use more or omit all together)
1 Sleeve of chocolate cookie cookies (I like Oreo)
WHAT YOU'LL NEED TO DO:
Preheat the oven to 350F
Take package of chocolate cookies with 2 tablespoon of melted butter and grind in food processor until you get a fine crumb
Line muffin pan with cupcake liners.
In the bottom of each cupcake liner, add some of your cookie crumb to the bottom and likely press down to form the cookie crust.
Then sift the flour, sugar, baking soda and salt into a medium mixing bowl.
Put the butter in a small saucepan and, when melted, add the cocoa and water and bring to a boil.
Add the boiling cocoa mixture to the dry ingredients (flour, sugar, baking soda, salt, mini marshmallows and nuts) and stir until just combined.
Add the buttermilk, eggs, and vanilla and stir until smooth.
Pour equal amount of batter into cupcake liners and bake until a toothpick inserted in the center comes out clean.
This will take between 20-30 minutes depending on your muffin pan. I use a stoneware pampered chef muffin pan so it take about 30 minutes, might take less in a tin one.
Transfer to a wire cooling rack and allow to cool before frosting.
Labels:
Baked Goods,
cupcakes,
Emeril
Alton Brown's The Chewy Gluten Free
I never tried making Alton Brown's "the chewy" before, but I have heard so many rave reviews that I wanted to try it first hand and see what the fuss was all about. When searching for the "chewy" I can upon a gluten free version, with all the food allergies I figured that I would try this recipe and see how it came out.
I must say, I was really impressed, they were really big, fully and soft, but my still all time favorite cookie recipe is my other chocolate chip recipe. This one comes in at a close 2nd. I recommend giving them a try you wouldn't be disappointed.
Happy Baking!
Recipe courtesy Alton Brown, 2007
WHAT YOU'LL NEED:
8 ounces unsalted butter
11 ounces brown rice flour, (2 cups)
1 1/4 ounces cornstarch, (1/4 cup)
1/2-ounce tapioca flour, (2 tablespoons)
1 teaspoon xanthan gum
1 teaspoon kosher salt
1 teaspoon baking soda
2 ounces sugar, (1/4 cup)
10 ounces light brown sugar, (1 1/4 cups)
1 whole egg
1 egg yolk
2 tablespoons whole milk
1/2 teaspoons vanilla extract
12 ounces semisweet chocolate chips
WHAT YOU WILL NEED TO DO:
Preheat the oven to 375 degrees F.
Melt the butter in a heavy-bottom medium saucepan over low heat. Once melted, pour into the bowl of a stand mixer.
In a medium bowl, sift together the rice flour, cornstarch, tapioca flour, xantham gum, salt and baking soda. Set aside.
Add both of the sugars to the bowl with the butter and using the paddle attachment, cream together on medium speed for 1 minute.
Add the whole egg, egg yolk, milk and vanilla extract and mix until well combined.
Slowly incorporate the flour mixture until thoroughly combined.
Add the chocolate chips and stir to combine.
Chill the dough in the refrigerator until firm, approximately 1 hour.
Shape the dough into 2-ounce balls and place on parchment-lined baking sheets, 6 cookies per sheet.
Bake for 14 minutes, rotating the pans after 7 minutes for even baking.
Remove from the oven and cool the cookies on the pans for 2 minutes.
Move the cookies to a wire rack and cool completely.
Pour tall glass of chilled milk and enjoy!
Labels:
Alton Brown,
Baked Goods,
Cookies
Subscribe to:
Posts (Atom)