My food blog is about the foods that I actually make for my family. My schedule is so crazy that I tend to turn meals that are easy for an active family, all while trying to make healthy choices. And of course you will find an occasional not so healthy meals, or treats but like they say..."everything in moderation!"
Wednesday, November 30, 2011
Crusty French Boules (Cooking Light)
I have to say that this month's Cooking Light magazine was the best issue yet this year. It had a ton of great recipes that I can't wait to try. One of the best things I found was the French Boules recipe. OK, I know what your thinking..."it can't possibly taste like the real thing!" Well your right it doesn't taste like the "real thing"...it's even better! I kid you not when I say, that this loaf of bread disappears within a matter of a day in my house. My husband who isn't big on bread will take a huge slice, toast it, slap some butter and eats it as a snack.
I think that one of the best things about this bread is that while the crust is crisp and hearty, the inside is light and flavorful. The only down falls is that it takes a few days to prepare. However it truly is well worth the time. I've made this recipe 3 times already and it has now become my go to bread recipe.
If you do try this recipe I would love to here your input, and I hope you all enjoy this recipe as much as my family and I have. Like always happy baking!
WHAT YOU'LL NEED:
For the Pâte fermentée:
1 1/4 cups of AP flour, divided
1/2 teaspoon active dry yeast
1/2 teaspoon salt
1/2 cup warm water (100° to 110°)
Cooking spray
For the dough:
3/4 cup warm water (100° to 110°)
1 teaspoon active dry yeast
2 cups of AP flour
2/3 cup bread flour
1 teaspoon salt
1 tablespoon cornmeal
WHAT YOU WILL NEED TO DO:
Prepare the pâte fermentée, by weighing 1 cup of AP flour into a dry measuring cup, and level with a knife. Combine flour, 1/2 teaspoon yeast, and 1/2 teaspoon salt in the bowl of a stand mixer fitted with paddle attachment.
Add 1/2 cup warm water, and beat at low speed until mixture is thoroughly combined.
Add enough of the remaining 4 tablespoons flour, 1 tablespoon at a time, until dough just begins to pull away from sides of bowl.
Increase mixer speed to medium, and beat for 2 minutes.
Place dough in a small bowl coated with cooking spray.
Place a piece of plastic wrap coated with cooking spray directly on dough. Refrigerate 48 hours or up to 3 days.
Once you're ready to bake your bread, remove pâte fermentée from refrigerator; let stand at room temperature 30 minutes.
Next prepare the dough, by placing 3/4 cup warm water in the bowl of a stand mixer with dough hook attached, and sprinkle with 1 teaspoon yeast.
Let mixture stand for 5 minutes or until bubbles form.
Add pâte fermentée to yeast mixture; let stand 10 minutes.
Spoon 2 cups flour, 2/3 cup of bread flour, and 1 teaspoon salt to bowl; beat at low speed until flour is incorporated.
Increase mixer to medium speed, and beat for 6 minutes. Dough will form a ball.
Place the dough in a large bowl coated with cooking spray; lightly coat dough with cooking spray.
Cover with plastic wrap, and let stand in a warm, dry place, free from drafts, for 1 1/2 hours or until doubled in size.
Punch dough down, and divide into 2 equal portions.
Knead each portion for 1 minute. Shape each dough portion into a 5-inch round by pulling the sides down, pinching and tucking them under the bottom center of dough, forming a smooth, taut surface on the top.
Place dough rounds on a baking sheet sprinkled with cornmeal. Lightly coat surface of dough with cooking spray.
Cover and let rise 1 hour and 15 minutes or until doubled in size.
Place a small ovenproof saucepan with 3 inches of water directly on the floor of oven. Preheat oven to 450°.
Uncover dough. Spray dough lightly with water. Make 4 (4-inch) cuts 1/4 inch deep in dough to form a grid across top of each loaf using a sharp knife.
Bake at 450° for 10 minutes.
Remove water pan from oven.
Bake an additional 15 minutes or until bread is golden brown and sounds hollow when bottom is tapped.
Cool on a wire rack. Cut each boule, crosswise, into 12 slices.
Recipe source Cooking Light NOVEMBER 2011
Serves 24 (1 slice) Calories 82, Fat 0.3 Protein 2.5g CARB 17G, Fiber 0.6g
Saturday, November 26, 2011
Skinny Mini Oreo Cheesecakes!
It's that time of the month again, and that means that it's time to get our What's Baking entries in! This month Jessica from http://www.thejeyofcooking.com decided that this month's challenge would be "Something Savory" and to be honest, I really had a hard time with this one. Not because it couldn't come up with something, but more so because when I went to buy the ingredients either I couldn't find what I was looking for, or the product seemed to be below par.
The fact that I've been consumed with work and the holidays didn't help matters either. My mind was going a million miles an hour that I couldn't tell you how many things I baked/cooked that I could have used for this What's Baking Challenge. The sad thing is when I did realize it, we were almost done with our meals or I had already cut into the baked goods without taking a picture.
Lucky for me, my husband and I were hosting Thanksgiving, and in his opinion, not having cheesecake at a holiday party is like having Thanksgiving without turkey!
This year I took my skinny mini cheesecakes and changed them up a little, just to do something a little different while still trying to keep things lighter. The great thing about this recipe is that you get that wonderful cheesecake flavor and each cheesecake and each is just under 90 calories. How can you go wrong with that! Do you know how many calories are in a piece of cheesecake at the cheesecake factory?
All I am going to say is even if you had all 12 mini cheesecakes you would still have consumed less calories then you would in one slice from the cheesecake factory! I have always been big on finding ways of eating everything without the guilt. It's so true, you really don't have to give up all foods to maintain weight, you just have to use the right ingredients, and of course have everything in moderation.
Recipe adapted from The most decadent diet cookbook
WHAT YOU WILL NEED:
Butter flavored cooking spray
12 reduced fat chocolate wafers cookies
8-10 Oreos finely crumbled in the food processor to mix into your batter
12oz of fat free cream cheese at room temp
1/3 cup of sugar
2 tablespoons fat free vanilla yogurt
1.5 teaspoons vanilla extract
1 teaspoon unbleached all purpose flour
2 large egg whites
WHAT TO DO:
Preheat oven to 300
line 10 cups of a standard muffin tin with cupcake liners.
Lightly mist them with cooking spray
Place one wafer in the bottom center of each cup, flat side down.
In food processor added or Oreos and grind until fine.
Now in your mixer, beat cream cheese and sugar on medium until well combined. Add yogurt, vanilla, and flour and mix on low until just combined.
Fold in Oreo and set aside.
In another bowl whisk together egg whites until soft peeks form.
Use spatula and gently fold the eggs into the cream cheese until mixture is just combined. (You don't want to over mix)
Divide the mixture among the muffin tins.
they will puff up and the tops will crack once the are baked.
Transfer cheesecakes to cooling rack and cool at room temp. Refrigerate for at least 5 hours.
I hope you enjoy this as much as my family does.
1 Cheesecake has 90 calories, 6g protein, 17g carbohydrates, 1g fat.
Sunday, November 13, 2011
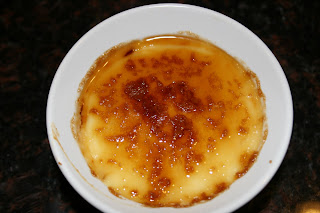
Creme Brulee
The past few months I feel like all I've been doing is working, working, working. Which means that dinner in our home has been very basic. Not that basic meals are a bad thing, it's just that I found myself making the same things each week.
This weekend I was thinking about it, and I really feel like my husband and son haven't had anything special in a long time. So I decided to hold off on my original recipe for the What's Baking Challenge, and I was determined to make them something new. The plan was to make something healthy and that was a little more time consuming, and was a recipe that I knew I could not make on a weekend after working a 10hr day.
Therefore, Saturday night I made a beautiful piece of grilled salmon, with a side broccoli risotto, and for dessert you guessed it I made CREME BRULEE for the first time.
And if you haven't guessed it....it was delicious!!! The Brulees had a perfect smooth creamy texture and a nice crisp sugar topping. Both my son and Husband were very pleased and since my husband has asked when I was going to make it again. Therefore I plan on making it for Thanksgiving this year.
I hope you all enjoy it as much as we did and like always...Happy Baking!
Recipe source: Allrecipes.com
WHAT YOU'LL NEED:
6 egg yolks
6 tablespoons white sugar, divided
1 teaspoon vanilla extract
2 1/2 cups heavy cream
2 tablespoons brown sugar
WHAT YOU'LL NEED TO DO:
Preheat oven to 300 degrees F
Beat egg yolks, 4 tablespoons sugar and vanilla in a mixer until thick and creamy.
In a saucepan heat cream over low heat until it almost comes to boil.
Remove the cream from heat immediately.
Take a cup of the cram and stir into the egg yolk mixture; to make sure that it tempered before adding it to the reminder of the cream, stir until combined.
Pour cream mixture into the top of a double boiler.
Stir over simmering water until mixture lightly coats the back of a spoon; this will take about 3 minutes.
Remove mixture from heat immediately and pour into a shallow heat-proof dish.
Bake in preheated oven for 30 minutes. Remove from oven and cool to room temperature.
Refrigerate for at least 1 hour, or overnight.
Before serving Preheat oven to broil.
In a small bowl combine remaining 2 tablespoons white sugar and brown sugar.
Sift this mixture evenly over custard. Place dish under broiler until sugar melts, about 2 minutes, make sure to keep a watchful eye so doesn't burn.
Remove from heat and allow to cool. Refrigerate until custard is set again.
Labels:
Baked Goods,
What's Baking Project
Subscribe to:
Posts (Atom)